True Beauty Layout – Bo Bunny Layout Challenge

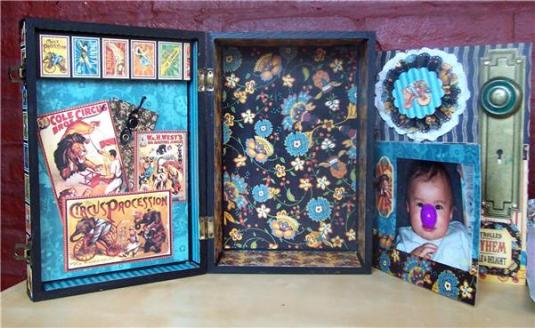
Bo Bunny has a wonderful sketch posted for their challenge this month, so I knew I just had to play along! I selected this photo of Madison that I’ve been meaning to get to. It’s so hard for me to get a good picture of her unless I catch her by surprise…even then, it’s hit or miss…when she poses for the camera, she tends to plaster an odd smile on her face (like so many children do!) or when trying not to have a fake smile, she won’t smile at all and therefore appears sullen when she’s not. My one and only daughter is also full of attitude, so it often shows in her photos. lol πŸ˜€ I happened to catch her just right in this pic, so I figured it would be perfect for the BB Sketch. The Gabrielle range was perfect w/the purple of her shirt, so here’s my take:

Materials:

Bo Bunny Gabrielle papers
BB Gabrielle chipboard stickers
BB Gabrielle layered chipboard
BB Gabrielle layered stickers
BB Gabrielle Cardstock sticker
BB Gabrielle Trinket
Distress Inks
Hero Arts crocheted trim
cream seam binding
Inkssentials white pen

Adhesives:

Helmar Adhesive Runner
Helmar Zap Dots
Helmar Acid Free Glue

Tools:

2 different Fiskars border/edge punches

Based on the BB challenge sketch:

TFL! Entries are due on 7/28/11 around 4pm eastern (see the countdown clock next to the inlink button for exact deadline). If you’d like to link up your take on the sketch, CLICK HERE.

Advertisement

Simple Man – Layout for Helmar and Punky Scraps

At the beginning of July, Helmar posted their gorgeous challenge sketch by Lydell Quinn. I knew right away that I just HAD to work this sketch! Now that I’ve completed my dt work for the month, I’ve had a chance to play around on some other challenge sites this week and have been cruising through some of my faves to see what they have posted.

Punky Scraps is a very unique challenge site and they post 3 challenges a month. This month, one is to use tissue paper on your layout. As luck would have it, I just received some fab 7 gypsies tissue paper that I was planning to use on a project this month! So, I figured this would be perfect to combine w/the Helmar sketch challenge!

A couple of weeks ago, Larry’s Aunt gave me a few photos of Larry’s father that I’ve been dying to scrap, but really wanted to make sure I created something Larry would love. Larry’s father passed away a year before he and I met, so I never got to meet the man who was, by far, the greatest influence in Larry’s life. From the stories I’ve heard, Larry is very much like his father and this particular photo is very special to me because, not only is it the only photo I have of the two of them together, but it also shows them doing something together that they both love. His father taught him to play the guitar, fish, hunt…not to be afraid of hard work. He taught Larry to enjoy the little things in life and what really matters. There’s a particular song that always comes to mind whenever I imagine the two of them playing their guitars together, so I used it as the title of my page. Here’s what I came up with:

Materials:

Pink Paislee (Helmar Preferred partner) Butterfly Garden Cardstock
7 Gypsies Birdsong tissue paper
Pink Paislee wood alphas
Prima decorative border
Graphic 45 staples envelope
G45 staples trims
G45 Staples flower
G45 Staples metal flower
G45 Staples metal buttons
Distress Inks

Adhesives: Helmar Acid Free
Helmar 450 Quick Dry
Helmar Liquid Scrap Dots
Helmar adhesive runner
Helmar Zapdots

Here’s the fabulous sketch I got to work with:

TFL! If you’d like to play along with the Helmar challenge, CLICK HERE.

If you’d like to play along with the Punky Scraps challenge, CLICK HERE.

In case you’re not familiar with the song, I’ve embedded a youtube video below:

Graphic 45 Altered Box Part 2 – Finished

This project is my entry into Graphic 45’s metal challenge. Since I was hosting an altered box challenge on Paper Secrets last weekend, I used the first few steps as my example project (you can see the post showing the bare wood box and the after for the PS example on this post). I took it further for the Graphic 45 challenge since the point of that challenge is to include at least one of their new metal staples (embellishments) in your project. Well, last month I won the new G45 Le Cirque 12×12 paper pad, a Geometric metal knob and door plate staple and envelope tag staples on their blog. THANK YOU G45!!! To thank them properly, I thought it would be a good idea to use these items for the challenge. πŸ˜€

These photos pick up where I left off in my earlier post.

Here’s the exterior of the box:

When you open the box, on the left you see some of the cutouts that come in the paper back layered with a tag envelope staple tucked behind them:

Those cutouts are actually glued to a piece of repurposed chipboard to create a pocket that the envelope slides into. That way, I can hide special messages to my son in the envelope and it’s easier to add and remove the message. Also, if the envelope gets damaged from use, I can just replace it. πŸ˜€ On the right you see a photo of my son “clowning around” along with some embellishments, including the new metal knob and door plate by G45. πŸ˜€ Here’s what it looks like w/the envelope removed:

If you lift the flap the photo is mounted onto, it reveals 2 more photos mounted underneath:

You can also use the knob to lift out that entire section which is actually an insert that hides half the depth of the box, so it has a hidden compartment. Here’s the box with the insert removed:

I’ll have a tutorial on how to make the cardboard hidden compartment in another post at a later date. Hope you liked my project!

Materials:

unfinished wood box (from craft store)
Graphic 45 12×12 Le Cirque Paper Pad
G45 Geometric knob and door plate staple
G45 Tag Envelope Staple
doily
Folk Art acryllic paint
cardboard
chipboard

Adhesives:

Helmar 450 Quick Dry Liquid
Glue Arts Glue Glider Pro Perma Tac
Mod Podge (though I’ve heard you can use Helmar’s Acid Free Glue for decoupage)

Tools:

Sponge brush
EK Success scalloped circle punch
Martha Stewart doily lace border punch

Comments are always welcome and appreciated! Don’t forget I’m also offering up some blog candy for comments left on any post between April 3, 2011 and April 9, 2011! One comment per post per day please! Followers of my blog have a chance to win a separate prize! See THIS POST for further details and pictures. TFL!

Altered Box for the Paper Secrets Birthday Bash

The Paper Secrets Birthday Bash officially starts 10am PDT today on their forum! Come join in on all the fun games and challenges scheduled for this weekend…for each challenge you complete and upload to the gallery, you will be entered to win a prize. Each challenge has its own prize (pics of the prizes you could win are attached to the individual challenge posts). All entries need to be submitted by 11:59 pm PDT on April 4, 2011.

I’m hosting the altered box challenge. You can alter any type of box you’d like (cardboard, chipboard, wood, etc), as long as you incorporate paper in some way. You can make it as simple or as elaborate as you’d like! For my example today, I went with simple. I started with a plain wood/wooden box:

Then I painted the edges on the interior and exterior:

Then covered all sides with paper:

I’m actually going to be creating a type of photo shadowbox with this, so it’s not embellished yet in these photos. After the weekend, I will post more pics with the completed project. TFL!

***Once you get to the Paper Secrets Forum, just click the topic “Paper Secrets Birthday Bash Games & Challenges.” That will then take you to the challenge and game posts. :-D***