For today’s project, I created another fun altered Loaded Envelope for a swap. Creative Embellishments’ laser cut chipboard, wood veneer, rubber stamps, stencils, and flair buttons are perfect for creating fun and dimensional pieces for LE’s! They fun to alter and hold up to wet and dry mediums beautifully. to start out, I created the base of my loaded envelope by making the main pocket 6″ x 9″ with a gusset to allow for expansion. Then added a smaller front pocket that is also gusseted. Attached to the back is a 6″ x 9″ policy envelope that is adhered directly on the top, but attached with an accordion folded piece on the bottom to allow it to stand on its own like an easel. I applied the pink lace trim with a thin ribbon woven through it along the top edge of the envelop and along the top of the back piece as well. Then added the sequined blue lace to the sides and front of the smaller pocket. On top of that, I added the beaded lace piece. I altered the pocket by splattering it with black acrylic paint and white gesso, adding bits of the altered CE Wave Panel (I used blue acrylic paint mixed with white to create the pale blue shade), and layering a bit of cheese cloth. The chipboard pieces (mermaid, shells, flourish set 31, and coral) were all altered using PITT markers, and Lindy’s Stamp Gang color shots for a bit of shimmer. The wood veneer pieces (anchor and boat wheel) were altered with acrylic paint and PITT markers.
The main envelope, large tag, and wand: ![]()
I then added plastic “dew drops” as a finishing touch. Close up of the front pocket:

detail on the wood veneer pieces:

For the large tag, I altered the coral, shells, crabs, flourish 19, and flourish 20 the same as the other chipboard pieces, but heat embossed the jelly fish and mermaid after altering them with markers. Close up of the tag:
Detail shot of the altered mermaid:

Close up of the chipboard and die cut cluster:
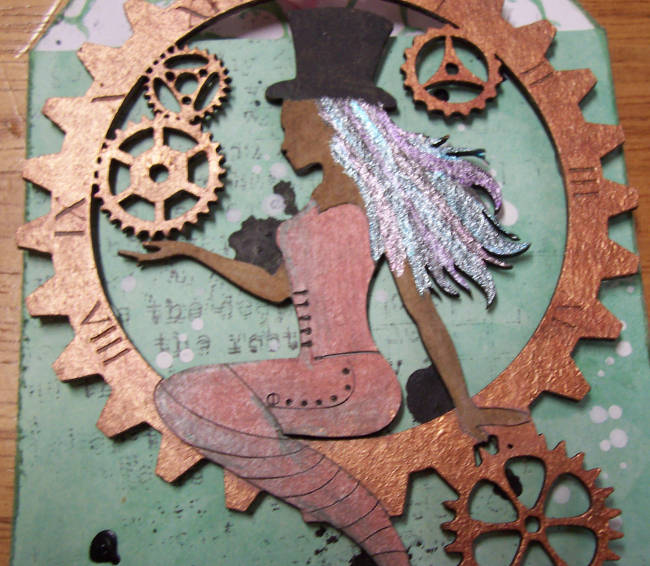
The 2 steampunk tags were created by splattering them with black acrylic paint, and white gesso, and stamping using both the Distressed Text Stamp and the Distressed Grid stamp. The gears (I used 2 sizes 3/4″ and 1″) were altered using acrylic paint. For both the Steampunk Mermaid 2 piece on the left and Steampunk Mermaid on the right, I used a combination of acrylic paint and PITT markers. It’s hard to see, but I used metallic markers to give the mermaids rainbow hair. 🙂 In this pic, there are 3 smaller tags (1 regular and 2 pocket tags), a stuffed mini policy envelope, 2 regular stuffed mini envelopes, and 3 altered paper clips:

Close up of the steampunk pocket tag and the altered jumbo paper clips it holds:

Detail shot of the altered steampunk mermaid:
Policy envelope back of the LE, packaged trims, packaged bling, shaker card, and assortment of stuffed mini envelopes:

To embellish the back, I started some of the same trims I used on the front, then added bits of the wave panel that were left over from the front, then layered cheese cloth over it, then added flourish 21, some shells, another crab, and more die cut pieces from the Kaisercraft die cut packet. Close up of the embellished back of the LE:

Using a Fuse tool, I created a shaker card for fun. 😀 I altered this mermaid the same way I altered the other one from this set. buried in the sequins and glitter, there is a starfish along with a conch shell, and some more cardstock die cuts. Though the Fuse tool did a good job closing up the pocket, I added washi tape to seal all the edges as a safeguard since I did include the dreaded glitter. lol Close up of the altered mermaid in the shaker card:

Finally, I loaded everything up, wrapped it in tissue paper and mailed it out to my trade partner. I hope she likes it! Here’s how it looks fully stuffed and ready to go:
*Contents of the mini envelopes: acrylic stamps, 15 washi tape samples, die cuts, acrylic frame stickers, foiled stickers, and washi tape sticker “flakes.”
TFL! If you’re interested in creating and trading LE’s, check out this group on facebook (it’s the one that organized the swap I participated in)…Loaded Envelope Galore.
All the CE products used on my project have been hyperlinked to open in a new window and take you directly to the store listing for more info. The paper kit and cardstock die cuts are made by Kaisercraft and are part of their Mermaid Tails collection.
Visit and follow the Creative Embellishments blog for more creative inspiration provided daily Mon-Fri by their extremely talented DT, plus some weekend shares as well! CE also features a monthly challenge (always pinned to the top of their blog)! Enter for your chance to win a $50 gc from their store!


