Mixed Media Birthday Tag – dt project for Creative Embellishments

Happy Thursday, everyone! I’m up on the Creative Embellishments blog with a quick, easy mixed media tag to share. I’ll be honest with you, I had totally intended to share a layout today and time sort of got away from me, which tends to happen when you’ve got 5 kids. lol So…I quickly got this tag together and it never ceases to amaze me how EASY CE products make it to embellish ANY type of project! No joke! Whether it’s a layout, canvas, altered piece, card or tag, once you have your theme in mind, CE products help you pull it all together with ease!

For my tag, I was loosely inspired by Nicolle’s birthday layout of her mother. I just loved how she used the distressed music note bg w/the music note border piece and the Happy Birthday title. So for my tag, I kept that feel to it, but used completely different products! 😀 Here’s how it turned out by using the Mesmerizing Music Notes stamp and Birthday Fun wood veneers:

Happy Birthday tag

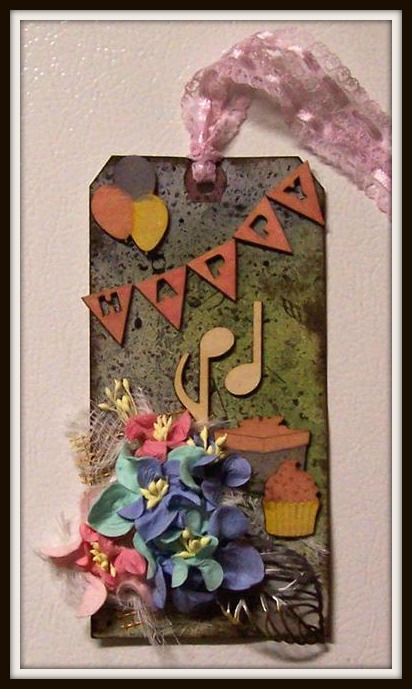
I created the background by misting with Art Anthology mists, then used stazon ink to stamp the Mesmerizing Music notes onto it. I then inked the edges of the tag and flicked the whole bg w/some black paint (diluted so I wouldn’t get big globs). I altered the wood veneers using a mixture of the mist used on the bg (sprayed onto a palette and brushed on like paint or ink), silks glaze and Art Anthology Velvet paint, but I did leave the music notes bare. Layered under my flower cluster is a bit of painted mesh and some cheese cloth for added texture and dimension. Hope you like it! 😀

Materials:

Creative Embellishments Mesmerizing Music Notes Stamp<BR>CE Birthday Fun wood veneers
CE Music Notes wood veneers
Blank tag from my stash
Dry wall tape
acrylic paint
cheesecloth
metal leaf
Art Anthology mists and Velvet paint
Silks paint
I am Roses flowers
ribbon from my stash
Distress Ink
Stazon Ink

TFL!


Advertisement

Tim Holtz 12 tags of 2013 – May

After taking a long break from crafting I’m now getting myself ready to re-enter the craft world, so to get my feet wet I figured a tag would be the best way to go. 🙂 When I think about tags, I can’t help but also think about Tim Holtz and his fabulously grungy, vintagy (is that even a word? lol), technique-filled creations, so I stopped by his blog for inspiration.

Each month, he shares a new tag, posts a tutorial on how he created it and challenges readers/followers to link up their creations inspired by that month’s tag. You can follow along as loosely or as closely to his design as you’d like. 😀

Here’s what I came up with:

Materials:

#8 tag
Fancy Pants rubons
Distress stains
Distress ink
Unity Stamps
Staz On ink
Tim Holtz Idea-ology Film Strip Ribbon
TH Idea-ology Muse Token
TH Idea-ology Word Band
TH Idea-ology Trimmings
G45 brad

Adhesives:

Helmar Liquid Scrap Dots
Terrifically Tacky Tape

Thanks for looking! To check out Tim Holtz’s tag, the challenge or the other entries, CLICK HERE.

Graphic 45 Christmas Past – Toilet Paper Roll Tag

The current Graphic 45 challenge on their blog is to create a holiday tag using their product and post it on their facebook wall labeled “Holiday Tag Challenge” before December 15, 2011.

My favorite type of tags to make utilize empty toilet paper rolls that have been flattened to create a sleeve and decorated, then a more simple tag (even a plain one) is inserted into the “pocket” to slide out with your to and from, sentiment or message. For my entry, this is the type I made.

I started by flattening an empty roll, and painting the edges roughly in slightly diluted white acrylic paint. I then cut a rectangle of G45 Christmas Past paper slightly smaller than the face of the sleeve I created, and inked the edges with Distress ink. I then took the image in the center of one of the diecut frames in the same collection and fussy cut the tree out of it. Distress inked the edges, then dabbed the candle flames with Distress Stickles in Rock Candy, traced the gold strands with Stickles, the red ornaments with Stickles and the pearls with Liquid Pearls and set aside to dry.

I then fussy cut the Santa image from the Victorian Greetings sheet and applied a very light coating of Liquid Pearls to the fur details on Santa’s hat, coat and boots. Using the tip of the bottle, I mottled the surface while wet to give it more texture and more realistic furry appearance. I dotted the red elements of the holly on Santa’s belt and the toys with Stickles and set aside to dry.

The sentiment which reads, “Compliments of the Season,” is a diecut tag from this collection, so all I did was punch it out of the page, ink the edges in Black Soot Distress Ink and apply a dot of red Stickles to the holly berries on each side of the sentiment.

I used Helmar Premium Craft Glue to adhere the gold rectangle of paper to the tp roll, and the tree to that base. I then attached the sentiment using Helmar’s Clear Zap Dots since it provides a touch of dimension, but not as much as the foam Zap Dots. Santa is propped up with a layer of foam Zap Dots. With the sleeve complete, I lightly distressed the inner tag with a touch of Distress ink and tied a red sheer ribbon on it that has just a touch of shimmer.

Here’s how it turned out:

TFL!

True Beauty Layout – Bo Bunny Layout Challenge

Bo Bunny has a wonderful sketch posted for their challenge this month, so I knew I just had to play along! I selected this photo of Madison that I’ve been meaning to get to. It’s so hard for me to get a good picture of her unless I catch her by surprise…even then, it’s hit or miss…when she poses for the camera, she tends to plaster an odd smile on her face (like so many children do!) or when trying not to have a fake smile, she won’t smile at all and therefore appears sullen when she’s not. My one and only daughter is also full of attitude, so it often shows in her photos. lol 😀 I happened to catch her just right in this pic, so I figured it would be perfect for the BB Sketch. The Gabrielle range was perfect w/the purple of her shirt, so here’s my take:

Materials:

Bo Bunny Gabrielle papers
BB Gabrielle chipboard stickers
BB Gabrielle layered chipboard
BB Gabrielle layered stickers
BB Gabrielle Cardstock sticker
BB Gabrielle Trinket
Distress Inks
Hero Arts crocheted trim
cream seam binding
Inkssentials white pen

Adhesives:

Helmar Adhesive Runner
Helmar Zap Dots
Helmar Acid Free Glue

Tools:

2 different Fiskars border/edge punches

Based on the BB challenge sketch:

TFL! Entries are due on 7/28/11 around 4pm eastern (see the countdown clock next to the inlink button for exact deadline). If you’d like to link up your take on the sketch, CLICK HERE.

Previous Older Entries