Altered Helmar “Glue Daddy” Caddy

Caution: This post is photo heavy!

I was so excited when I came home from picking the kids up from school on Friday to find my Glue Daddy Caddy waiting on my doorstep! It didn’t take long for me to tear open the box and take it for test spin. Here’s the naked caddy decked out with my fave Helmar glues:

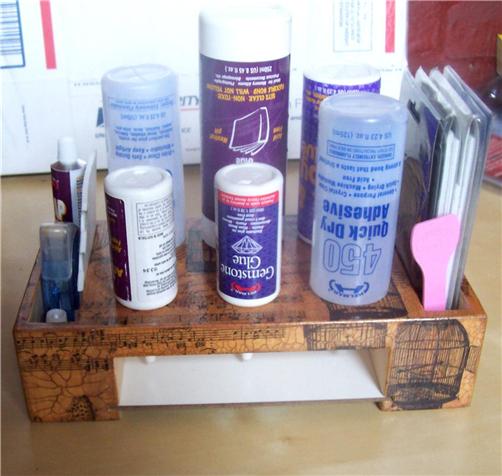
I knew this would be something I wanted easily accessible on my craft table and would be used frequently, so I had to make sure I created something that would really last. I started by applying Acid Free glue to one face of the caddy at a time and adhering tissue paper by 7 Gypsies. To remove the excess, I simply let the glue dry then sanded the edges, then moved onto the next side. Once all sides were covered, I inked the edges with distress ink. I then applied the 2 step crackle. Since this was my first project using this product, I was a little nervous, but let me tell you…it was soooo easy to use and the results are fantastic! I could readily see the crackle affect, but to accentuate them, I lightly buffed the piece with a papertowel dipped in a bit of brown acrylic paint. Working it into the cracks, I wiped the excess off with another part of the papertowel as I went, then sealed with Helmar’s Acrlic Sealer.

I LOVED the affect so much I didn’t want to cover the tissue paper design or crackle too much, so I only embellished one end of the holder with a couple 7 Gypsies sprocket gears, a Graphic 45 chipboard button and flower.

Here’s the finished piece with the fabulous Helmar products that helped make it happen:

Here are my happy glues in their new home:

TFL!

To order your own Glue Daddy Caddy from Tracy (Pres of Helmar USA), CLICK HERE. There are 2 models to pick from…mine, pictured above, is the deluxe model. The difference between this one and the standard model? The Deluxe model has pockets on the sides as shown. 😀

Sketch #98 – Let’s Capture These Sketches Now Live

The latest sketch created by Charlotte for Let’s Capture These Sketches has been posted. Entries need to be linked through the inlinkz widget by the end of the month to be entered to win a prize. Sketch #98 was so much fun to work with. I hope you stop by to check out the other dt member’s creations and play along! Here’s my take on the sketch:

Materials:
Webster’s Pages Waiting for Santa pp
WP Waiting for Santa 6×6 papers
WP Waiting for Santa Journaling Spot
WP Waiting for Santa Fabric Ribbon
WP trims
WP Waiting for Santa Floral Bouquet
WP diecut stickers
Prima Say it Crystals (one flourish that I cut apart)

Adhesives:

Helmar adhesive runner
Helmar 450 Quick Dry
Helmar Scrap Dots
Helmar Zap Dots

Here’s the fabulous sketch 98:

TFL!

Sweet Little Diva Layout – Berry71Bleu and Let’s Scrap

This layout of Madison was actually created last month for two separate challenges. One was a sketch from Let’s Scrap. Though it was a 2 page sketch, they allow you to either create a 2 pager or just pick one half for inspiration. I opted to use the right half for the layout. The other was a recipe challenge on Berry71Bleu. The recipe called your the layout to include: 1 cardstock base, 3+ patterned paper (1 of which must be a circle of at least 10cm), 1 lace/ribbon/trim, 1 journal spot, 2 buttons and 4 embellishments of your choice (I decided to add 1 more button, 1 more journal spot, rhinestones and stickles), a title of your choice. Here’s what I came up with:

Materials:

Bazzill cardstock
Webster’s Pages Let’s Celebrate papers
WP Let’s Celebrate Journaling cards
WP Let’s Celebrate trim
Teresa Collins blingage
WP Vintage Inspired Buttons (Sparklers)
WP Storytellers Alphas
Cosmo Cricket Tiny Type alpha stickers
Stickles
Ranger/Inkssentials White Pen

Adhesives:

Helmar Adhesive Runner
Helmar 450 Quick Dry
Helmar Gemstone Glue
Helmar Scrap Dots
Helmar Zap Dots

Tools:

Martha Stewart circle cutter
EK Success Paper Shapers punch

Be sure to check out both sites for their fab September Challenges!

Love Everlasting – Let’s Capture These Sketches

Earlier in the summer a relative gave me this photo of Larry’s parents sitting together. It’s hard to find a photo with just the two of them since Bruce was so active in the community, did a lot of volunteer work and they had such a large extended family. When I saw sketch #96 for our dt work at Let’s Capture These Sketches, I knew this was the photo I wanted to use. Picking out the right product proved to be a bit harder. At the time, I had just finished a layout working with the Cosmo Cricket Fleuriste line and the colors seemed to work for this photo as well, but things were not clicking for me an I think it had a lot to do with not have the right embellishments to go with the papers for this page, so I switched gears and went with Prima’s fabulous Botanical Collection and things fell into place for me then.

I chose the title Love Everlasting for this piece because it’s just the two of them and I can’t help but think of love and devotion when I see it. Bruce passed away a year before Larry and I met, so it’s been over 8 years and Grace has never once taken off her wedding ring and has no intentions of doing so. For her, it’s not “’til death do us part”…it’s “until we meet again.” Here’s what I came up with:

Materials:

Prima Botanical Collection papers
Prima Botanical Collection stickers
Prima Botanical Collection diecut stickers
Prima trim
Prima flowers
Kaisercraft pearls
October Afternoon mini market alpha stickers
Pink Paislee Wood Shop Alphas
Tattered Angels Glimmer Mists
Distress Ink

Adhesives:

Helmar 450 Quick Dry
Helmar Liquid Scrap Dots
Helmar Zap Dots
Helmar adhesive runner

Here’s the fab sketch #96 by Guest Sketch Designer, Sue Sykes:

TFL! If you’d like to play along with sketch #96 or any of the other wonderful sketches for this month, CLICK HERE.

Previous Older Entries Next Newer Entries