Creative Embellishments online Birthday Crop

Creative Embellishments just turned 5 and to celebrate, they’re hosting a HUGE online Birthday Crop filled with 8 mini challenges and 9 amazing prizes!!! Be sure to join their fan group on Facebook and click “going” on the event in order to play along and enter to win some goodies! All the challenges begin today, September 15th at 9 am ET and entries must be posted by midnight on Monday, September 17 (which is technically September 18th at 12 am ET). You do NOT need to use CE products on your projects to enter and win prizes! However, for those who do use CE products on their entries, there’s a BONUS PRIZE opportunity, so you have 2 chances to win with each project you create using CE products! 🙂

I’m one of the volunteers hosting a challenge this weekend and since birthdays usually come with presents, gift cards, cards, etc., I’d like you to either make a package or alter one! So either take an empty container and alter it or make an envelope box, gift bag, etc. For my examples, I altered/repurposed 2 empty boxes. One was the box my Webster’s Page Pocket TN came in and the other is a square jewelry gift box. Here’s how they turned out:


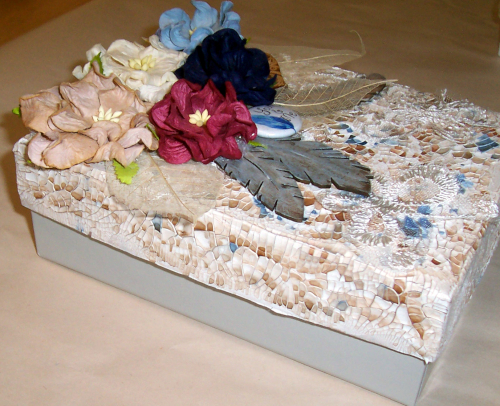
I started out by applying Finnabair/Prima crackle texture paste and allowed it to air dry. Then used Lindy’s Stamp Gang color shots to bring out the crackle pattern that emerged and give it more color and texture. Next I added bits of Webster’s Pages netting to each box. For the larger box, I added CE chipboard feathers that I altered with gesso and the same LSG color shots I’d used for the base, and a wood veneer heart from the CE Lovers Hearts Set. I finished it off by adding some skeleton leaves and flowers and a flair button from the Birds of a…. set.

A couple of close ups:


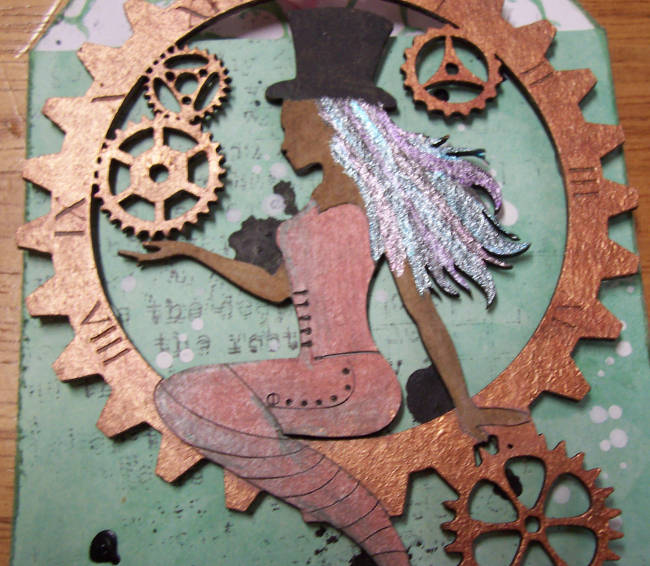
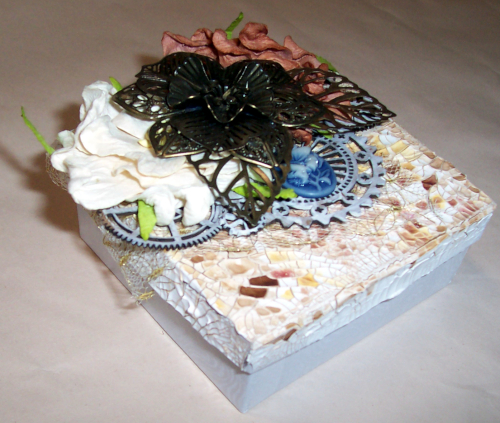
For the smaller box, I applied some gesso to one of the corners from the Steampunk Corner Set and snipped off the smallest 2 gears on both sides to better suit my box’s size and layered the cut off bits between the remaining 3 larger gears on the piece. I then topped this one off with a pair of flowers, a couple of metal leaves and layered metal flowers. Then finished it with a blue cameo tucked into the space created they layered elements.

Close ups of the smaller box:


One winner will be selected from all the entries on my challenge to receive this prize pack:


Here are the other prizes that will be awarded for the challenges during the crop (there are FOUR $30 gift vouchers that will be given out)…

IF you do use CE product on your entry projects, you can also enter to win this BONUS PRIZE:


I hope you enjoyed my examples for the challenge! To help give you more ideas, I’ll be posting photo tutorials on how to make an envelope box for A2 sized cards later today and a quick and easy gift bag base tomorrow. 🙂

Some important links:

CE store: https://creativeembellishments.com/

CE fan group: https://www.facebook.com/groups/1985585078160468/


Advertisement

Summer ATCs and Coffee Themed Pocket Letter

As we say goodbye to summer and usher in the new season with its cooler weather, I decided to share two separate projects I created recently using some fabulous products by Creative Embellishments. 😀 First up, I created a four ATC set for a trade partner I met through a facebook group. Since all 4 were for a single recipient, I made them all similar, yet different. For the base, I distressed and layered papers that I’d stamped with the CE Distressed Text Stamp and splattered with black India ink, then swiped a bit of gesso onto corrugated cardboard. I topped each cardboard piece with some wood veneer pieces from the CE Summer,  Anchor, or Boat Wheel sets. I finished them with a bit of tied twine around each piece. Here’s how they turned out:


Close ups of the individual cards:


Next, I created a coffee themed pocket letter. For the base, I dyed the white cardstock background paper with real coffee grounds, then splattered it with a Lindy’s Stamp Gang color shot and Tattered Angels glimmer mist used the same color shot to add “cup rings” to the page. I then added fussy cut images from a Heartfelt Creations paper pad. I then added my CE Coffee set pieces which include the title (altered using acrylic paint), the layered CE “to go” cup (altered with with gesso and acrylic paint), and the cup and saucer (altered with PITT artist markers). I left the wood veneer Coffee Cup piece bare. Here’s how my pocket letter turned out:


Close ups of each row:


TFL! I hope you enjoyed my projects! If you haven’t already, be sure to check out our September Challenge post for info on how to enter for a chance to win the $50 gc prize!

Back to School Themed Pocket Letter – Creative Embellishments

Lately, I’ve been having so much fun creating and swapping pocket letters with others across the US. So, for today’s Creative Embellishments post, I incorporated elements from their September Challenge. I decided to create a Back to School themed PL for my trade partner since I was inspired by the letters, numbers, and colors in this this month’s inspo image. I did not use this as an example for the challenge though because I did not incorporate this month’s twist (stamp an image in the background of your project).

Here’s the CE September Challenge Inspo Image if you’d like to play along this month or would like to see the inspiration for my project:

Here’s what I came up with:


Close up of the top row:


1st panel:


2nd and 3rd panels:


Middle row:


1st panel:


2nd and 3rd panels:


1st panel bottom row:


2nd and 3rd panels in the bottom row:


Front of the finished pocket letter:


Back of the finished pocket letter:


Creative Embellishments products used:

Chipboard

Bookbags

Alphabet Border

Crayon Set


Wood Veneer

Simple Clock

School Set (chalkboard, ruler, pencil, apple with worm, school bus)

Basketball

Tennis Ball

Globe

Music Notes

Geek Chic Glasses


Flair Buttons:

Elementary Set 3

School Days 


Be sure to check out the Creative Embellishments 20% off storewide anniversary sale! 😀

Mermaid Loaded Envelope – Creative Embellishments

For today’s project, I created another fun altered Loaded Envelope for a swap. Creative Embellishments’ laser cut chipboard, wood veneer, rubber stamps, stencils, and flair buttons are perfect for creating fun and dimensional pieces for LE’s! They fun to alter and hold up to wet and dry mediums beautifully. to start out, I created the base of my loaded envelope by making the main pocket 6″ x 9″ with a gusset to allow for expansion. Then added a smaller front pocket that is also gusseted. Attached to the back is a 6″ x 9″ policy envelope that is adhered directly on the top, but attached with an accordion folded piece on the bottom to allow it to stand on its own like an easel. I applied the pink lace trim with a thin ribbon woven through it along the top edge of the envelop and along the top of the back piece as well. Then added the sequined blue lace to the sides and front of the smaller pocket. On top of that, I added the beaded lace piece. I altered the pocket by splattering it with black acrylic paint and white gesso, adding bits of the altered CE Wave Panel (I used blue acrylic paint mixed with white to create the pale blue shade), and layering a bit of cheese cloth. The chipboard pieces (mermaid, shells, flourish set 31, and coral) were all altered using PITT markers, and Lindy’s Stamp Gang color shots for a bit of shimmer. The wood veneer pieces (anchor and boat wheel) were altered with acrylic paint and PITT markers.

The main envelope, large tag, and wand:


I then added plastic “dew drops” as a finishing touch. Close up of the front pocket:


detail on the wood veneer pieces:


For the large tag, I altered the coral, shells, crabs, flourish 19, and flourish 20 the same as the other chipboard pieces, but heat embossed the jelly fish and mermaid after altering them with markers. Close up of the tag:


Detail shot of the altered mermaid:


Close up of the chipboard and die cut cluster:


The 2 steampunk tags were created by splattering them with black acrylic paint, and white gesso, and stamping using both the Distressed Text Stamp and the Distressed Grid stamp. The gears (I used 2 sizes 3/4″ and 1″) were altered using acrylic paint. For both the Steampunk Mermaid 2 piece on the left and Steampunk Mermaid on the right, I used a combination of acrylic paint and PITT markers. It’s hard to see, but I used metallic markers to give the mermaids rainbow hair. 🙂 In this pic, there are 3 smaller tags (1 regular and 2 pocket tags), a stuffed mini policy envelope, 2 regular stuffed mini envelopes, and 3 altered paper clips: 


Close up of the steampunk pocket tag and the altered jumbo paper clips it holds:


Detail shot of the altered steampunk mermaid:


Policy envelope back of the LE, packaged trims, packaged bling, shaker card, and assortment of stuffed mini envelopes:


To embellish the back, I started some of the same trims I used on the front, then added bits of the wave panel that were left over from the front, then layered cheese cloth over it, then added flourish 21, some shells, another crab, and more die cut pieces from the Kaisercraft die cut packet. Close up of the embellished back of the LE:


Using a Fuse tool, I created a shaker card for fun. 😀 I altered this mermaid the same way I altered the other one from this set. buried in the sequins and glitter, there is a starfish along with a conch shell, and some more cardstock die cuts. Though the Fuse tool did a good job closing up the pocket, I added washi tape to seal all the edges as a safeguard since I did include the dreaded glitter. lol Close up of the altered mermaid in the shaker card:


Finally, I loaded everything up, wrapped it in tissue paper and mailed it out to my trade partner. I hope she likes it! Here’s how it looks fully stuffed and ready to go:

*Contents of the mini envelopes: acrylic stamps, 15 washi tape samples, die cuts, acrylic frame stickers, foiled stickers, and washi tape sticker “flakes.”

TFL! If you’re interested in creating and trading LE’s, check out this group on facebook (it’s the one that organized the swap I participated in)…Loaded Envelope Galore.

All the CE products used on my project have been hyperlinked to open in a new window and take you directly to the store listing for more info. The paper kit and cardstock die cuts are made by Kaisercraft and are part of their Mermaid Tails collection.

Visit and follow the Creative Embellishments blog for more creative inspiration provided daily Mon-Fri by their extremely talented DT, plus some weekend shares as well! CE also features a monthly challenge (always pinned to the top of their blog)! Enter for your chance to win a $50 gc from their store!

Previous Older Entries