Kaisercraft Beyond the Page Altered Box

Today I’d like to share a fun project I got to work on for the Firefly Expression Blog. This week they’re featuring Kaisercraft, so the base of my project is their Beyond the Page All Purpose Box which is available in their store for $8.99. I wanted to show how you can easily mix old and new products with this fab line, so I used Webster’s Pages Country Estate Papers from their previous release, Pink Paislee’s Butterfly Garden rubons (received in my August prize kit from Marivic at Berry71bleu) and older Fancy Pants rub ons. The little pearls on the lid are also by Kaisercraft and are available in the Firefly Expressions Store for just $0.50.

See that fabulous green, blinged out butterfly on the front? It was also included in the fab prize pack Marivic sent me. Be sure to check out her fun September challenge for your chance to win an incredible kit too! 😀

And of course EVERYTHING is held together using fantastic Helmar adhesives!

I started out by slightly sanding, then painting it with vanilla acrylic paint. I didn’t coat it heavily because I wanted a lightly whitewashed kind of look to it. I then used the Helmar acid free glue to adhere the Webster’s Pages papers that I cut to size and fussy cut to layer images onto the lid. I then added a fabulous Unity stamp sentiment, some rubons and bling.

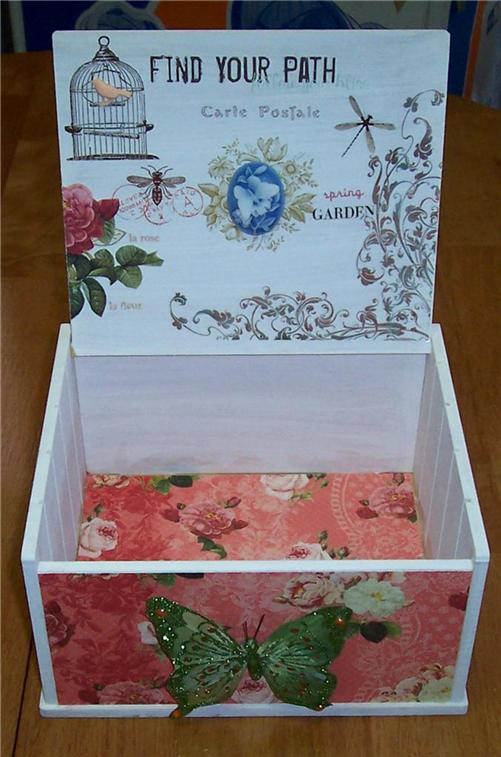
The cameo and resin bird are adhered with Helmar 450 Quick Dry and I used Liquid Scrap Dots for the butterfly. TFL!

Post-It Note Holders – Inspired by Helmar

Nearly every Monday, Helmar has live Ustream classes that are really fun to watch. The ladies that participate each week are so much fun to chat with and there’s a different creative project featured each week. On August 22, 2011, Tracy was the host (sometimes it’s Jess aka Kinderstampo), and she made the cutest little post-it note holders that I thought were just perfect for teacher gifts! This year I needed to create 5 gifts (Matthew’s teacher is on maternity leave after having baby number SEVEN so he has a long-term sub). Here’s the link to her recorded show: Note Holder Tutorial

In the video, Tracy shows how easy they are to make using regular square coasters with rounded corners, but I didn’t have any on hand and it didn’t seem likely that I could just duck into a restaurant and grab a few. lol But…last week Larry happened to be waiting for the car to be inspected and went to lunch with his boss. While out, he actually remembered that I needed some and snagged me 10. So he not only remembered that I needed them, but also remembered how many! How great is THAT?!! 😀

Anyway, I decided to make one a little different and used a 4×8 scalloped chipboard rectangle that I cut in half to create the 4×4 size I wanted. On another one, I trimmed of a 1/4″ off of one side to give it a different shape. So far, I’ve made 4 out of the 5 I need, so keep an eye out for #5 coming soon! Here’s how mine turned out:

I went ahead and took a pic of the inside on two of them because there are two things that I do that are not in Tracy’s video. The first difference…though I do bind with the seam of the rings on the inside of the covers, so it’s not exposed, I also glue the rings down using Helmar 450 Quick Dry to make it easier to open and close. The ring is then attached to the base and the cover is free to move along it’s track w/o taking the rings with it.

The second difference…In Tracy’s video, she removed the backing on the post-it pad and glued the pad to the base. For mine, I also removed the backing, but I glued just the top 1/2″ (the part that has the removable adhesive already on it) to a piece of 3″ x 3″ cardstock which is the same size as the post it pad. I then added a strip of patterned paper to the base where it is only glued on the 2 side edges. Once dry, you can then slip the cardstock backing that you added to the post it pad under that strip to hold it neatly in place. Normally I would match the pattern so you can’t see where this strip is, but for one I used contrasting paper so you can easily see what I’ve done.

TFL!

Where’d He Go? layout – Sweet Peach August sketch

Earlier this month, a lovely sketch was posted on the Sweet Peach Crop Shop blog. I decided to combine it with the Pink Paislee color palette for July since those are the papers I would be using. The palette is also due today and I hadn’t worked it yet!

These photos were taken when Larry was playing peek-a-boo with Christian, who is 4 months old in these pics. Every time Larry would disappear, Christian seemed genuinely concerned about where his daddy had gone! 😀

I inked the background and handstitched the banners. Ideally I would have liked to have the “go” part of the titling done in clear alphas outlined with a touch of glitter, but since I didn’t have any, I scraped the glitter off of those 2 letters and coated them with light blue stickles to have them blend into the background more. Here’s what I came up with for the sketch and palette:

Materials:

Pink Paislee Parisian Anthology Divine Damask paper
PP Daily Junque Map paper
Bazzill cardstock
PP Daily Junque Ephemera pack
PP Hocus Pocus glitter alphas
stickles
Distress Inks
Color Box Pigment inks
DMC embroidery floss

Adhesives:

Helmar adhesive runner
Helmar Zap Dots

This is the Sweet Peach August sketch I was working with:

This is Pink Paislee’s July Hot Hues Palette I was using:

TFL!

To check out the Sweet Peach Crop Shop challenge, CLICK HERE.

To view the gallery or see future challeges at Live Pink, CLICK HERE.

Last set of Layouts from the Scrapbook Challenges Event

***Warning – This post is photo heavy*** In order to get the rest of the layouts from last month posted quickly so I can move onto this month’s reveal at Let’s Capture These Sketches, the last 4 layouts from last month are all in this one post.

I had a lot of fun working with this next sketch. I ended up rotating it 90 degrees and using 2 photos instead of 1. I also relocated the title to suit my layout. Here’s what I came up with for Sketch SS03:

I used the Pink Paislee Daily Junque line and used the patterned paper to create a nice scalloped border and the flower I pieced together. Fun line to work with. 😀 Here’s the fab sketch I got to use:

For the next one, I went CAS again. The sketch already was pretty clean, but I straightened out the wavy lines and added a bit flowers and glitter. Here’s my take on Sketch SS12:

For this one, I stuck with Crate Paper’s Emma’s Shoppe. The border punch is by Martha Stewart. I added stickles to my flowers. Here’s the sketch I worked with for this one:

Next up is a departure from my norm once again. One of my goals for this year is to scrap “real life” so not just the happy moments but real life stuff that happens. So, I scrapped about what happened this last Winter and how we found out Matthew had Lyme Disease. I used sketch SS07:

Simple Stories Destination papers and Life Documented stickers. G45 metal flower, paper flowers and brad. Maya Road trim and Pink Paislee green alphas. Here’s the sketch I used:

This last one I did for fun. The sketch looked really interesting and had a lot of possibilities, so I really liked working with it. I decided to go with Matthew being…well, Matthew! lol This super photogenic little guy poses for pics, but then when he’s had enough starts making funny faces. I guess he was quite distracted by the baby, cuz I managed to get tons of fab photos before he started sticking out his tongue and being goofy (normally it’s soon after the first pic). I scrapped most of the other photos, so I figured I might as well scrap this fun photo too. 😀 Here’s my take on Sketch SS14:

October Afternoon 5 and Dime papers, stickers and chipboard. Here’s the super fun sketch:

TFL!

Previous Older Entries Next Newer Entries