Happy Birthday Wish – dt layout for Creative Embellishments

WOOHOO It’s birthday month over at Creative Embellishments. Not only is my birthday in April, but Nicolle and Sandi are also celebrating birthdays this month. 😀 Since Nic is turning the big 4-0 this year, she’s decided that for this month’s challenge, she’ll be giving away a $40 gc to the Creative Embellishments store to the winner! How awesome is that?

The challenge this month is use the inspiration image any way you’re inspired and select at least 4 items out of the list of 10 to use on your page. You may use any other embellishments you’d like, as long as you also incorporate at least 4 items from the list.

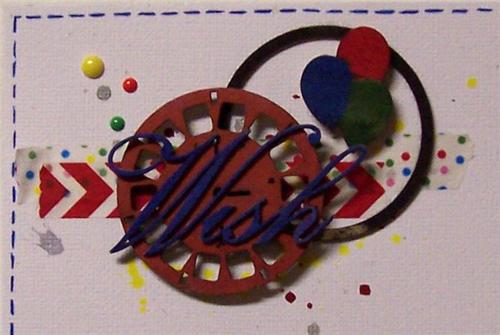
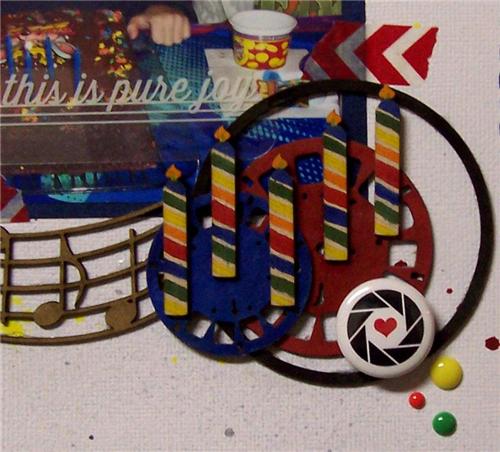
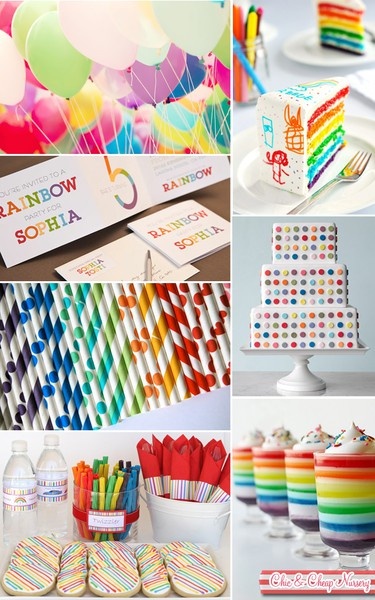
For my page, I was inspired by the birthday theme of the inspo image and the colors, candles, balloons, cake, stripes and dots. From the list, I was originally going to use most of the items, but had a change of plans, so instead I simplified and went with these 4 items: doodling, enamel dots, mist and paint, bling (rhinestones on the crown).

I was also inspired by Sketchabilities sketch #112, so I used the CE Rings for So Many things and View Master Photo Slides to replace the circular elements and flowers from the sketch. The wood pieces from the Birthday Fun wood veneer set were all altered using PITT artist markers. The word “wish” at the top of my page is actually cut from the Wishful Thinking title piece. The remaining 2 CE products I used for my page are the Happy Birthday title piece and the Wavy Music note border (which I left raw).


Here’s how it turned out:

Happy Birthday Wish


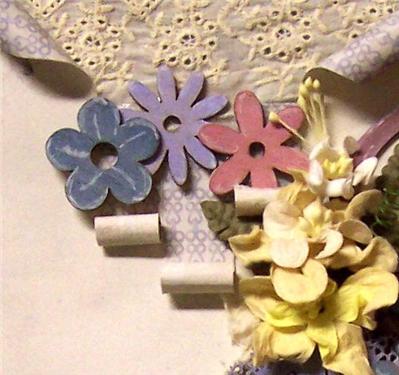
Here’s a close up of the top left cluster:
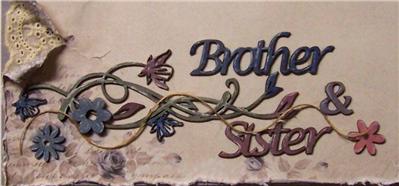
Happy Birthday Wish detail 1


The title:

Happy Birthday Wish detail 2


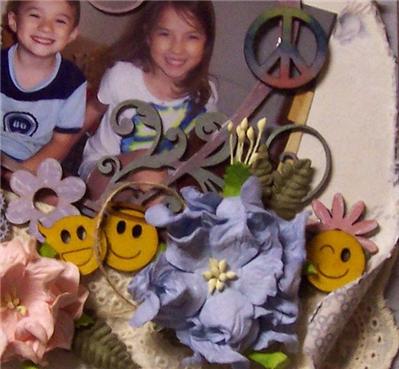
The bottom right cluster:

Happy Birthday Wish detail 3


Sketch #112 from sketchabilities:

sketchabilities #112


The CE April Inspo image:

April challenge


The list of 10 items (use 4 or more on your challenge entry):

Straws/rolled paper
trims- ribbon, lace, bakers twine or hemp
doodle
enamel dots or buttons
mist/paint
Texture paste, gesso
A handmade flower
embossing- dry or heat
Bling- Rhinestones or pearls
A flourish


Advertisement

Dream On – dt layout for Creative Embellishments

Happy Thursday, everyone! I’m up on the Creative Embellishments blog with a layout of my youngest son. This photo was taken a couple of years ago, the one and ONLY time he ever fell asleep unintentionally. lol Christian is not only a night owl, but he takes after me in other ways too. He doesn’t tend to just fall asleep randomly like other babies and toddlers do. He snuggles with his blanket, lays down, closes his eyes and knows he’s falling asleep…all but this once that I’m aware of. One minute he was sitting up and jabbering away and the next, he was slumped over and asleep. Just.like.that. lol

To create my page, I used several Creative Embellishments stamps on the background and layering some CE chippies with papers and metal pieces that I intentionally rusted. To alter the title, circles and panel, I just applied acrylic paint. For the view master slide, I then inked over it with distress ink. The frond I gessoed, then used distress stain, allowing it to puddle unevenly on the piece and air dry.

I was also inspired by sketch #111 from Sketchabilities. 😀

Dream On

The fabulous sketch I worked with:

sketchabilities #111

Materials:

Creative Embellishments Distressed Text stamp
CE Distressed Chicken Wire stamp
CE View Master Photo slide
CE Frond Set 2
CE Rings for So Many Things
CE 6×6 Mesh Panel
CE Dream On title piece
Tim Holtz papers, distress ink, distress stain
acrylic paint
gesso
india ink
Tattered Angels glimmer mist
dry wall tape
iron filings
metal flowers and butterfly

TFL!

Brother & Sister – dt layout for Creative Embellishments

Wow! I can’t believe it’s Thursday already! Time has been flying by so quickly! I’m up today with a layout to share on the Creative Embellishments blog. For my layout this week, I continued with pics from the same sitting as last Thursday’s page, but this time it features both Madison and Matthew. They are so cute together and as close as ever. I altered my chippies and wood pieces by applying a light coat of gesso, staining with Tim Holtz distress stains and highlighting with a white signo pen. My page was also inspired by the Mojo Monday sketch at Flying Unicorn

I’ve been struggling lately with my pages not turning out quite how I’d intended. It’s always a learning process and still fun to play around and keep on trying different things. The lower left portion w/my title is how I’d envisioned, but the rest isn’t quite where I’d wanted it to be and that is OKAY. Learning to let go and let it be is all part of the process. 😀 Here’s how my page turned out:

Brother and Sister

A close up of the top middle cluster:

Brother and Sister detail 1

Here’s the detail shot of the right cluster:

Brother and Sister detail 2

This is the portion that actually turned out how I’d envisioned:

Brother and Sister detail 3

Materials:

Creative Embellishments Heart Flourish Frame
CE Flourish Set 5
CE Family Words
CE mini Steampunk timepiece
CE Retro Flowers Wood Veneers
CE Peace Wood Veneers
CE Emoticons Wood Veneers
Pion papers
Webster’s Pages lace
I am Roses flowers
TH distress stains
White signo pen
twine

TFL! Be sure to check out the Creative Embellishments facebook page to see how YOU could WIN a $50 gc to their store! Also check out their blog to play along with our March challenge! 😀

Angel of Mine – dt layout for Creative Embellishments

I am soooo thrilled that today is the first reveal for the new dt at Creative Embellishments! I just love what everyone came up with for their examples for the March challenge. Be sure to stop by the CE blog and check it out! 😀

For my take on the challenge, I was inspired by the colors, placement of the colors, the flowers, butterflies and fairy wings from the inspo photo. There’s also a stunning sketch by one of our team members, Tammy, to combine with the inspiration image this month.

To create my page, I started with white cardstock and adhered crumpled tissue paper to the areas I wanted each color. Once dried, I went over the wrinkles lightly with gesso to bring out the texture. I then added a doodled border to go with the whimsical feel of the page and tied that in by outlining a few of the fussy cut flowers. All of my chippies have been altered with a silver gelato and PITT markers.  Here’s what I came up with:

Angel of Mine

The awesome inspiration image this month:

ce march insp image

The gorgeous sketch for the March challenge, created for us by Tammy Henderson:

ce march sketch

Materials:

Creative Embellishments Angel of Mine title piece
CE Flourish set #1
CE Butterflies
CE Ornate frame
Webster’s Pages New Year New You pp
Pink Paislee tissue paper
tissue paper from my stash
PITT artist markers
gelatos
gesso

TFL! To play along w/the challenge, just combine the sketch with the March image (in any way that it inspires you) and link up your project on the CE blog by Midnight EST on March 31st for your chance to win a $20 gc to the CE store! 😀

Previous Older Entries Next Newer Entries