Valentine’s Treat Bag – Creative Embellishments

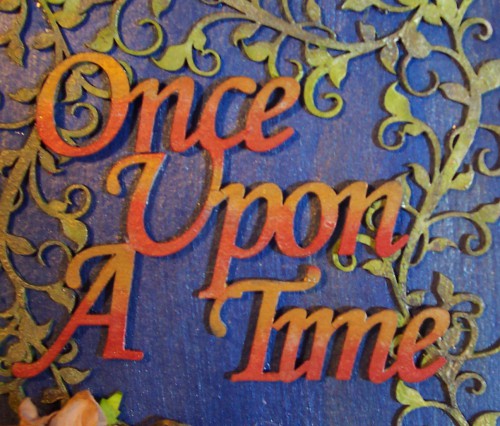
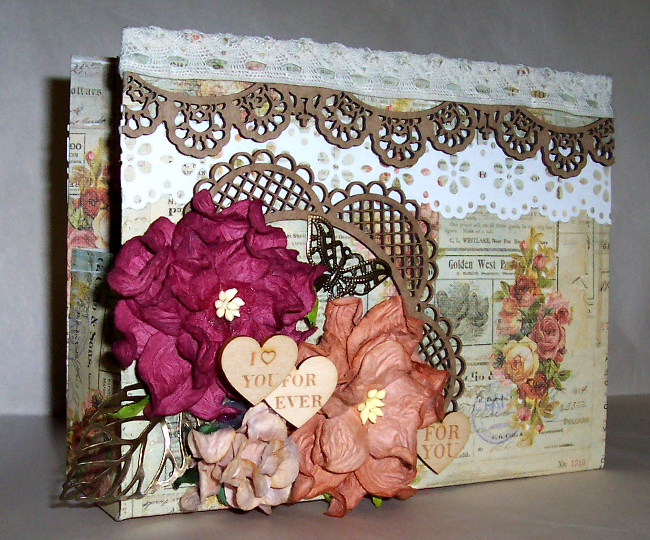
Valentine’s Day is nearly upon us and this year, I figured I would hand make some treat bags for the kiddos and make each of them unique. The one I’m sharing today was created for my daughter, Madison, using Prima papers, I am Roses flowers, and of course my favorite Creative Embellishments laser cut chipboard pieces and veneers! 😀 To create the base, I took a 12 x 12 sheet of card stock and scored the left and right 2.5″ in from the sides. I then rotated the paper 90 degrees and scored it at 5″ and 7″. I then folded it to create the center pocket and glued them in place. From there, it’s the fun part…embellishing! 😀 Since the paper I selected was kind of vintage looking, with muted colors, I decided to leave the chippies and wood pieces bare to lend it an earthy appeal. I hope you (and my daughter) like how it turned out!

valentines bag

This pics shows the side a bit:

valentines bag side

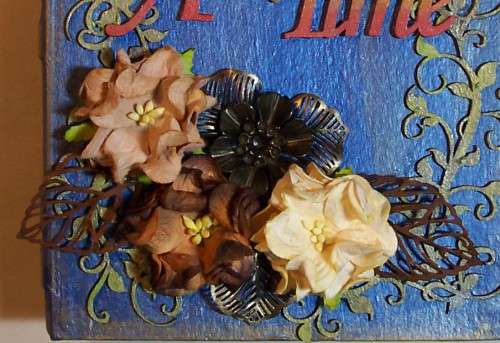
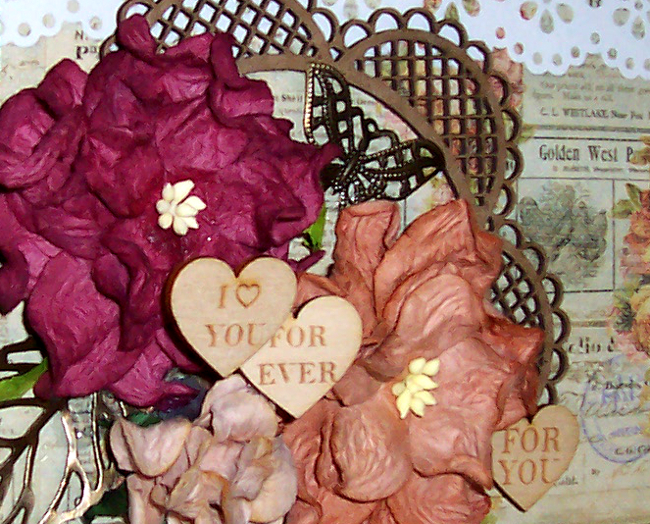
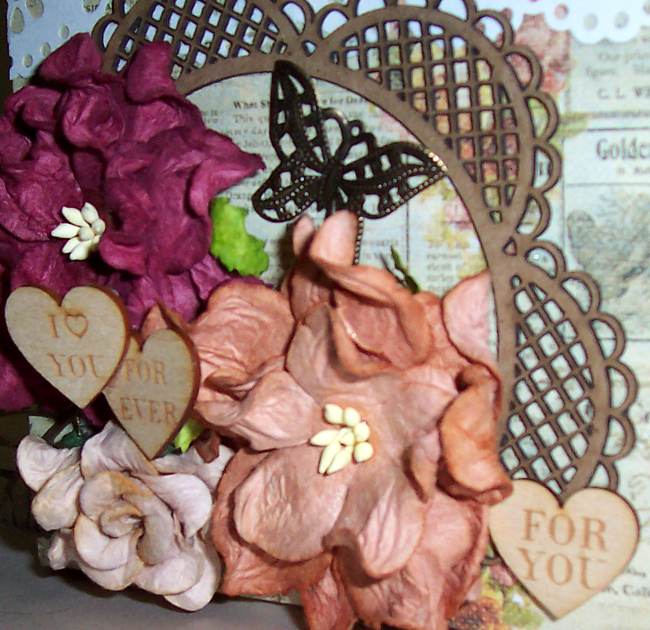
Close up of the cluster with the wood veneer pieces:

valentine bag close up 1

Close to show the dimension:

valentine bag close up 2

The awesome CE products I got to use (click the pic to be taken to their listings in the store)…

fancy scalloped lace-800x800doily-frame-296-600x600conversation-hearts-399-600x600

Advertisement

Creative Embellishments 1 Year Anniversary Blog Hop

10628415_10203678378312121_516905720848332466_n

Welcome the Creative Embellishments 1st Anniversary blog hop. I’m honored to be taking part in this momentous occasion! If you stumbled on the hop here, then please go to Creative Embellishments blog for the hop details and begin the hop on Nicolle’s blog here… >> http://nicollelovesscrapbooking.blogspot.com/

I am happy you are here with us today to celebrate the Creative Embellishments 1 year anniversary! To celebrate, we’re having a dt hop and giving away FOUR $25.00 gift vouchers to the store! All you need to do to be entered to win one of the vouchers is leave a comment on the hop post on the CE blog letting them know what your favorite CE product is, then leave some love on each of our design team member’s blogs then follow each blog. We’re each sharing a project with our favorite CE product on it. The winner of the hop will be randomly selected and announced on Monday September 8th.

I LOVE Creative Embellishments’ product, so it was very hard to for to pick a favorite. Their laser cut chipboard is so intricate and lovely, their wood veneers are detailed and darling! Their newest product line, flair, are so awesome to work with and I can’t say enough about their laser etched rubber stamps. Those are awesome for mixed media projects. Since I couldn’t make myself pick a single favorite, I decided to go with two categories. Their frames and title pieces are definite MUST-HAVES!

With my pieces chosen, I decided to create an off the page project for you all today. I hope you like it! 😀

100_9784


100_9785


100_9781


100_9792

100_9794


Nicolle Kramer’s Blog: http://nicollelovesscrapbooking.blogspot.com/ (START HERE!!!)
Doris Widder: https://distressedscrapper.com/ (YOU ARE HERE!!!)
Emilia van den Heuvel’s blog: http://few-favourite-things.blogspot.nl/ (GO HERE NEXT!!!) 😀
Karan Gerber’s blog: http://karangerber.com/
Michelle Gallant’s blog: http://scrapsandpixels.blogspot.ca/
Sandi Clarkson’s blog: http://softsideofsandi.blogspot.com/
Tammy Henderson’s blog: http://myscrappingplace-tammy.blogspot.com/
Shona Keehn’s blog: http://suchawonderfulmess.blogspot.ca/
Creative Embellishments Blog: http://creativeembellishments.com/blog/

Altered Box – dt project for Creative Embellishments

Hi, everyone! It’s Thursday, so I’m up on the Creative Embellishments blog (I’d love it if you’d stop by and say hi!) to share a project I created using some of the fabulous CE chippies! I love the versatility of these intricate laser cut pieces. They’re perfect for layouts, cards, altered art, art journal pages and altered art projects. 😀

I started with a plain wooden box that I’ve had around for years. I actually use it to store my Pitt Big Brush markers and artist pens. I started by adhering 7 gypsies tissue paper to the entire outside, being careful to match up the pattern to give it continuity. I then coated it with Helmar 2 step crackle. Once that was set and dry, I filled in the beautiful cracks it created with deep brown acrylic paint. I just buff it on and wipe off the excess with a slightly damp rag or paper towel.

Once the base is complete, you can decorate it any way you want! 😀 Here’s how mine turned out:

altered box

Here’s an angled shot so you can see the front too:

altered box 2

To alter the birdcage, I used Pitt big brush markers and artist pens (yes, the same one I normally store in this box. lol), then I went over the birds with a bit of Tattered Angels Glimmer Glaze to give them some shimmer and shine:

altered box detail 1

This flourish is actually a single piece that I cut in half, then painted w/Tim Holtz distress paint dabbers in 2 shades of green. I then added to the cluster w/some gorgeous I Am Roses flowers, a Prima Junkyard Findings bulb and a Webster’s Pages charm:

altered box detail 2

TFL! I hope you liked my project! Be sure to check out the CE October challenge post HERE. You could win a $20 gc to the Creative Embellishments store…and $20 goes a long way in there! 😀

Materials:

Creative Embellishments Birdcage
CE Flourish from set 4
7 gypsies tissue paper
Helmar 2 step crackle
acrylic paint
I Am Roses flowers
Wild Orchid Crafts metal embellishment
Prima Junkyard finding bulb
Webster’s Pages charm
Pitt big brush markers
Tattered Angels Glimmer Glaze
Tim Holtz Distress Paint
Shimmerz Texturez

#Happy – dt layout for SWAT {plus 3 challenges}

For my example for the SWAT 3 s’s challenge (stitching, stamping, spray/splatter), I might have gone a little overboard combining with other challenges…I love combining challenges…

Here’s what I came up with:

Materials:

Creative Embellishments Social Hash Tags title piece
American Crafts cardstock
Unity Stamps
Smooch mists
Pitt artist pens
rub ons
Freckled Fawn Wood Chips and arrow clip
lace from my stash
Prima stencils
Distress ink, stain and paint
acrylic ink
Harmonie acrylic shapes used as a mask
I am Roses flowers
Prima leaves

I created my page using photos of Madison on a boat themed ride at the York Fair 2 years ago. I figured it would kind of go with the transporation theme with csi case file #87. Working with given palette, I selected arrows, wave shapes, stitching and mist from the evidence column and had my journaling wander across the page for the testimony portion.

This is the inspiration image and palette for case file #87:

To further embellish my page, I incorporated the Flying Unicorn Welcome Back challenge criteria which was a sort of check list of what to include on your page:

Lastly, I always love to incorporate a good sketch, so I decided to play along with the Stuck on U Sketches sketch challenge. Here’s the fabulous sketch I worked with:

TFL!

Previous Older Entries