Review – Martha Stewart Scoring Board

I’ve wanted a scoring board (aka scoreboard) for a while now and after quite a bit of comparison shopping, I finally decided to get the Martha Stewart version. Though most products of this kind are very similar, the main features that set this one apart for me were the measuring increments offered, included an envelope guide and scoring tool, and compartments to house the guide and tool for storage. Unlike other versions, this one offers scoring guides every 1/8″ across the entire width of the board. The envelope guide is also very handy since it allows you to effortlessly place your paper at the perfect angle and has the proper measurements and score line placements printed right on the device. There is also an insert in the compartment that gives you the measurements for card sizes and boxes!


Using this convenient and easy to use tool, I created 3 gift bags. I referred to the tutorial offered on Scrap Whispers to enter their challenge, but made a few modifications.

This first bag is made using the instructions, but I folded in the top on each side by 7/8″ to reinforce the paper since I planned on adding ribbon handles. For this one, I used MME Bella Bella paper from their paperstack (not cardstock) and SEI ribbon.

For the second bag, I followed the instructions, but added a few additional score marks to allow the bag to close smoothly. I also punched 2 holes on each side so I could run the ribbon through both sides and tie a bow for the closure. This gift bag was created using cardstock from the DCWV Nana’s Nursery Baby Girl Stack and bit of Webster’s Pages trim that I took apart.

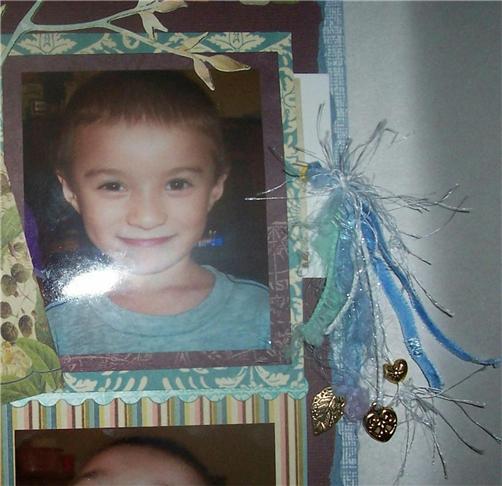
The additional score lines: When the instructions say to turn the paper and add a score line all the way down at 5″ and 7″ I added a short 1″ score mark at 6″ on both ends. Then scored 1″ from the edge of the paper and the end of that mark to where the lines intersect on each side of it and repeated for the other end. I then creased inward on these marks. It’s hard to describe, but I think you can see it well enough in this pic:

The third gift bag was made the same way as the second. For this one, I used Webster’s Pages Wrapping Paper from the Waiting for Santa line, fussy cut elements out of Reindeer Cottage from the same line and tied it with a strip of vintage inspired netting.

To view the tutorial I used or to enter the challenge, CLICK HERE

Review – Bo Bunny Midnight Frost Collection Pack

I just created a single page, multi-photo layout using the BoBunny Midnight Frost Collection Pack. The package includes 18 sheets of double sided cardstock (2 each of 9 designs) and 1 accessory sheet with alphas and coordinating diecut shapes. This line has such gorgeous, deeply rich colors, that I was very impressed. I love how many of the papers have one side that is more muted and feature a distressed appearance, making them fabulous bases for layering. I also greatly enjoyed the accessory sheet that comes with the papers. Here’s what I created:

For this layout, I used the sketch provided on their blog for their Friday challenge. CLICK HERE if you’d like to create a layout for their challenge too. Hope you enjoy the Midnight Frost collection as much as I did! 😀

Webster’s Pages – Scrapbook Paper and Embellishments

I’m pretty new to the world of scrapbooking, but I’ve done a lot of “shopping around.” I’ve discovered a lot of brands that I adore and will eventually get around to sharing them all with you, but I’d like to start with my absolute favorite! Webster’s Pages (www.websterspages.com) has papers, diecut pages, embellishments, trim, journaling cards, etc. that is to die for! Gorgeous, detailed, high quality products. Here are some pics of the layout I created using some of their fantastic papers, stickers and a journaling card.

This layout was created using core’dinations cardstock (the background paper), Webster’s pages 6″ x 6 ” paper for all of the photo mats and frames, Webster’s Pages stickers (the tree, branches and leaves, and butterflies) and journaling card (bottom left corner), Cloud9 rub-ons and Prima flowers.

Here’s a closeup of where I’ve tucked a hidden tag (with a private message for my son) which I matted with Webster’s Pages paper and tied with assorted fibers and charms.

This layout was my entry in the Webster’s Pages September Challenge. I was very impressed with the quality of the papers and how durable their journaling cards are. I adore their lovely designs and vintage look. I just wish I’d had more of their products to work with! I do feel, however, that my layout shows how nicely the Webster’s Pages products coordinate with anything you’ve got on hand. Their products would make a wonderful addition to anyone’s crafting supplies

Next Newer Entries