Daddy’s Girl – Creative Embellishments and CSI 182

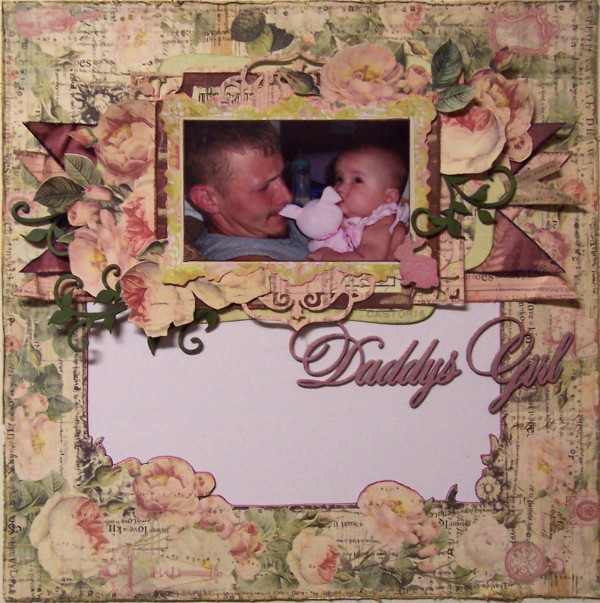
This month Creative Embellishments is sponsoring the challenges on CSI Color Stories Inspiration, so our team has been invited to guest design for them as well! I had a lot of fun cracking case #182. Their challenges are so unique since they combine color palettes with other criteria. For this case, I chose a white background, leaves/vines, mouse/other animal, and wet medium from the evidence category and chose the word “sweet” for my journaling. I attach journaling card to back of my layouts the majority of the time since it doesn’t tend to go with my design. I also like that including hidden journaling or a message on the back leaves a pleasant surprise for my children to find later. My journaling reads, “I have always loved watching your father play with you and your brothers, especially as babies. He’s so sweet and tender with you in particular since you’re our only daughter. It melts my heart and I get to fall in love with him all over again.”

Here’s how my page turned out:

Daddys Girl


Close up of the cluster on the left. I  altered the flourish piece with Pitt artist markers:

Daddys Girl close up 1

Close up of the cluster on the right:

Daddys Girl close up 2

Close up of the title piece. I altered the wood veneer bunny and title pieces with Silks paints:

Daddys Girl close up 3


CSI’s Case 182 mood board:

12067370_10206565708413569_1506134510_n


The CE products I used:

flourish-15-735-600x600daddy-s-girl-747-600x600bunnies-632-600x600


Spooky Halloween Tag – Creative Embellishments

I’ve always loved how Creative Embellishments makes it so easy to put together a quick card or tag without sacrificing dimension. For this quick an easy tag, I used 4 different background stamps. I used stazon ink with the text, crackle, and distressed grid stamps and layered them on the background. I then used the paint splat stamp to heat emboss some splatters for a little added color. I splattered some inks from Lindy’s Stamp Gang onto the base of my tag and misted it lightly with Tattered Angels Coffee Shop mist (my all time fave of their mists). Once I had that complete, I inked the edges with distressed ink. I altered by chippies with black, silver and white acrylic paint and heat embossed the title piece. Here’s how it all came together:

tag 2


Close up of the top of the tag:

tag close up top


Close up of the bottom of the tag:

tag close up bottom


the CE products I used:

creepy-trees-257-600x600scary word set-800x800tombstone border-800x800distressed-text-stamp-530-600x600distressed-grid-488-600x600distressed-crackle-stamp-637-600x600paint-splat-trio-stamp-762-600x600

Altered Webster’s Pages Color Crush Planner – Creative Embellishments

I’ve used a planner to keep myself organized most of life, but had gotten away from relying on one the last few years. Then I saw a deal on Blitsy that I couldn’t pass up! I’ve been a long-time fan of Webster’s Pages and love their Color Crush Planners, so I grabbed the pink one while I could (I think they have A5 sized ones coming out early to mid November, btw). 😀 WP is best known to me as a scrapbooking company, so I decided to have a little fun with it! I had a lot of fun combining my love of scrapping with the awesome Creative Embellishments products I get to work with! 😀 I just added a few fussy cut images from Graphic 45’s Happy Haunting paper line from a few years back and here’s what I came up with:

oct divider

Here’s an altered divider from the planner. It’s paper weight, so I gesso’d the page before staining the border with Distress Stain and splattering it with a few Tattered Angels mists in coordinating colors and some India ink. See that flair button peeking out at the top? I made paper clips using CE’s awesome flair buttons. Isn’t it adorable?!! I altered my wood veneer pieces with a mixture of acrylic paint, India Ink, Distress Stains and TA mists.

Here’s how it looks in the planner:

oct open to divider


I wasn’t really sure what I wanted to do with the pockets in the front cover, but then I thought of CE’s fabulous 3″ x 4″ wood cards! They’re great for pocket pages, project life and cards, but I decided to alter the Halloween one for that space. I just adhered a folded piece of cardstock to the back so I could slip that into the pocket to hold my wood piece in place. 😀 To alter it, I filled all the etched portions of the piece with glossy accents to help prevent the color from bleeding. I then colored in the moon portion with a PITT marker. I laid a quarter over the moon (perfect size!) to use as a mask and misted the rest of the card. It didn’t photograph well, but looks really cool irl. 😀

Here’s how it turned out along with 2 of the other paper clips I made with the CE flair buttons:

oct inside cover full


A closer view:

oct inside cover


I hope you enjoyed my project! Be sure to check out the Creative Embellishments store to take advantage of their 30% off SALE going on RIGHT NOW! The sale ends tonight at 11:59 PM ET!

The awesome CE pieces I used on this project (click the pic to be taken to the store listing)…

happy-halloween-3-x-4-card-251-600x600autumn-leaves-set-of-6-108-600x600pumpkins-146-600x600ghosts-set-of-6-274-600x600halloween-scene-2-248-600x600Trick-or-Treat-800x800

Altered Halloween Album Cover

One of the things I love best about all of Creative Embellishments products is that they make creating a fun, interesting project so quick and easy! The chipboard pieces and the wood veneers are so easy to alter (or leave bare) and add such incredible details, you literally, just add ink, paint, emboss and go! For my project today, all I used was a Tim Holtz cover for the base, a handful of CE’s amazing chippies, one wood veneer spider and some paints to create my entire cover. 😀

Here’s how it turned out:

album


Some close of the chippies:

album close up 3

album close up 1

album close up 2


The CE pieces I used (the images are linked, just click to be taken to the store listings) :

halloween-scene-set-1-247-600x600halloween-scene-2-248-600x600spiders-823-600x600

Previous Older Entries Next Newer Entries