Welcome to the Paper Secrets Holiday Hop! Each of our team members have a Holiday project to share with you. Be sure to visit all the blogs for chances to win some great prizes!!! If you didn’t hop over from Nicolle’s Blog, be sure start at the beginning of the hop so you don’t miss any of our posts. The fun begins on the Paper Secrets Blog, but the full line-up is at the bottom of this post so you don’t get lost along the way. 😀
Today, I’d like to share with you my example for the Paper Secrets December Manufacturer/Brand Challenge and my first GDT project for Helmar USA. If you’re not sure where to find Helmar’s fabulous adhesives, there’s a list of retailers and online prefered vendors on the left sidebar of their blog. 😀
Our featured manufacturer for the month at Paper Secrets is Webster’s Pages! Though there are many paper companies out there that I adore, Webster’s Pages has to be my hands down fave (or my obsession…however you want to read that)! With the help of some fabulous Helmar adhesives, here’s the wood train that I altered for my son, Matthew:

I started by painting the train with acrylic paint. I then papered the 2 cars with Webster’s Pages Waiting for Santa Papers using Helmar’s Acid Free Glue (LOVE this stuff! Works great on paper to paper applications too). Armed with my fave…Helmar’s 450 Quick Dry…I applied all the trims. The white fluffy trim is from Waiting for Santa, but the lace and super sheer trim is from Botanical Christmas. I took the WP sheer trim and cut in half lengthwise and put only the part w/gold detailing on the engine and reserved the rest for the bow on the Christmas Tree. The bling on the wheels are from a strip of their “dazzle me gems” that I cut apart. Here’s a closer look at the engine:

The Santa image is cut from one of the Botanical Christmas journaling cards. To make the Christmas tree, I stacked 3 styrofoam balls (held together by stringing them onto a craft stick (popcicle stick) and lightly coated them with Acid Free Glue. If I had a styrofoam cone, I probably would have used that instead, but I like to use what I have on hand. 🙂 I used a rock fern EK Success punch for the branches and layered them to the top. At the peak, I applied a glob of Liquid Scrap Dots to hold 4 of the branches forming a cap or peak. Here’s a closer look at the car holding the tree:

and a closer look at the last car:
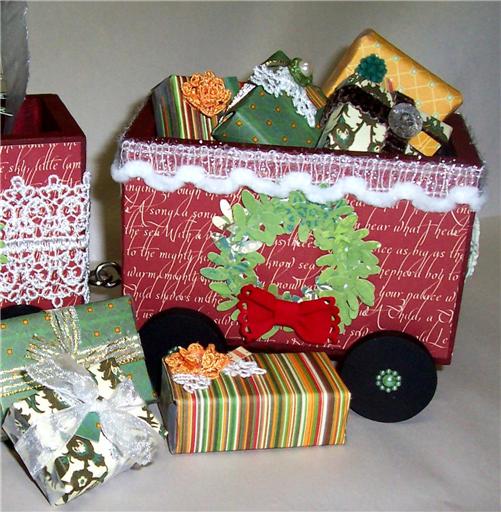
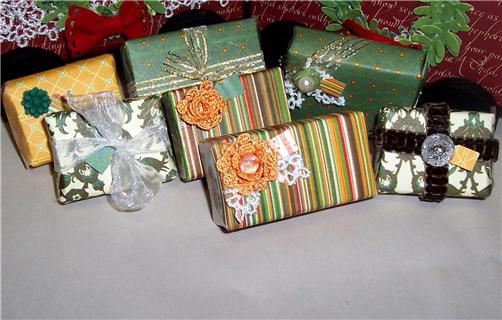
To create the wreaths, I used a circle punch to create a hole, then a larger circle punch over that hole to create a ring. I then coated the paper rings with Premium Craft Glue and applied the branches alternating having them point slightly towards the center then slightly outward…applied another layer of Craft Glue and then filled in the gaps with more branches. I then adhered the wreaths to the cars using 450 Quick Dry. I also used the 450 to attach the WP silhouette on the back of the train. The little “presents” are actually little boxes of candy and tattoos…the kind that are given out for Halloween. lol Dots, nerds, etc work the best since it gives you a stable base. I wrapped them in WP’s Botanical Christmas 6×6 petite papers and decorated them with their trims, sparklers, whimsy flower and added a tiny tag to each one. 450 Quick Dry made these itty bitty trim flowers a breeze:
I hope you enjoyed my project! Now for the prize! To be eligible to win this prize:
![]()
A $10 Paper Secrets Gift Certificate
***Please leave me a comment on this post. You can also follow my blog through Networked Blogs (or if you do not have facebook, then sign up to receive blog updates via email). 😀 The Blog Hop ends Dec. 4th, 11:59 pm PST. I will pick a random winner from the comments left on December 5, 2011.***
Let’s get to hoppin’!
Paper Secrets http://paper-secrets.blogspot.com
Rochelle Spears http://rochellespears.blogspot.com
Nancy Dare http://daretobeunique-nancy.blogspot.com
Joyce Casaldi http://1ashjoy.blogspot.com
Kimmy Jaster http://www.lostinadreamofjosh.blogspot.com
Nicolle Kramer http://nicollelovesscrapbooking.com
Doris Widder http://www.distressedscrapper.com <—YOU ARE HERE
Kristi Beisel http://devosmommy.blogspot.com <—YOUR NEXT AND LAST STOP ON THE HOP


Dec 02, 2011 @ 10:46:12
soooo cute!!!! Great idea!
Dec 02, 2011 @ 11:25:00
great blog! LOVE that train! New follower!
Dec 02, 2011 @ 11:29:21
Your train is awesome! Matt is loving it I bet. Thanks for the inspiration!
Dec 02, 2011 @ 11:34:58
The train is so cute!
Dec 02, 2011 @ 12:28:36
WOW! This is awesome! I LOVE IT! Such fab papers too! Thank you so much for the inspiration 🙂 x
Dec 02, 2011 @ 16:34:29
too adorable, love the train!
Dec 02, 2011 @ 23:16:54
Awesome train!
Dec 03, 2011 @ 13:58:41
AS a train lover – this is totally awesome! I may have to make one for my husband ! lol Thanks for the description of how you made it and what you used! I signed up for email – altho I have FB, I was getting too sucked in to play the games – and it was sorely cutting into my scrappin time! Thanks for sharing this great project!
Janelle
Dec 03, 2011 @ 14:27:05
omg, this is awesome, I love those teensy tiny presents and that tree totally rocks!
Dec 03, 2011 @ 16:15:02
Very cute train set. The color tone of the red is very striking!!!
ava
Dec 03, 2011 @ 16:26:38
SO SO CUTE! Love all the details!
Dec 03, 2011 @ 19:03:55
What a project! So detailed!
Dec 03, 2011 @ 21:10:36
I’m a follower and just love your train!! Too cute!! Love the little presents too 🙂
Dec 07, 2011 @ 00:22:01
Wow love it so many little details 🙂